How to Save Seeds: A Beginner’s Guide to Seed Saving
One of my earliest gardening memories is discovering that a dried marigold flower held dozens of seeds inside. I couldn’t believe my luck. Free seeds! I planted one, and I was hooked on gardening.
Learning how to save seeds is one of the most rewarding and practical skills a gardener can develop. When a plant produces seeds, it typically completes its life cycle. Saving those seeds is simple, cost-effective, and a great way to grow your garden season after season.
In this guide, you’ll learn how to save seeds using easy methods that are perfect for beginners.
Learning how to save seeds gives you a nearly-continuous supply of seeds that are adapted to your area at little or no cost.
What We Will Cover:
- Learn a little seed terminology before you save seeds
- Save seeds from only the best plants and fruit
- Seeds for saving must be fully developed on the plant or vine
- Learn how to harvest and dry both “wet” and “dry” seeds
- Once seeds are thoroughly dry, store saved seeds correctly
- Share your saved seeds with others
- Frequently Asked Questions About Saving Seeds
1. Learn a little seed terminology before you save seeds
Understanding how plants produce seeds and how they’re pollinated will help you be more successful at seed saving. These basic terms are helpful to know:
- Self-pollinating plants
These plants can pollinate themselves without help from insects, wind, or other plants. Because of their low risk of cross-pollination, they are great for first-time seed savers.
Examples: Beans, peas, lettuce, and tomatoes. - Open-pollinated plants
Open-pollinated varieties are pollinated naturally by insects, wind, or animals. They will grow true to type if they are not cross-pollinated with a different variety of the same species.
Many open-pollinated plants (especially in the squash, cucumber, melon, and corn families) readily cross-pollinate.
Tip: If you’re growing more than one variety of an open-pollinated species nearby, the seeds may not produce plants like the parent. Use isolation techniques, timing, or distance if you plan to save seed from these crops. - Hybrid plants (F1 hybrids)
Hybrid varieties are created by crossing two parent plants to produce a third variety with specific desirable traits.
Important: Seeds saved from hybrid plants usually do not grow true to type and often produce unpredictable or inferior results. It’s best not to save seeds from hybrids. - Heirloom varieties
These are open-pollinated plants that have been passed down for generations, typically 50 years or more. They are genetically stable and tend to produce consistent results from saved seed, making them excellent choices for home seed saving.
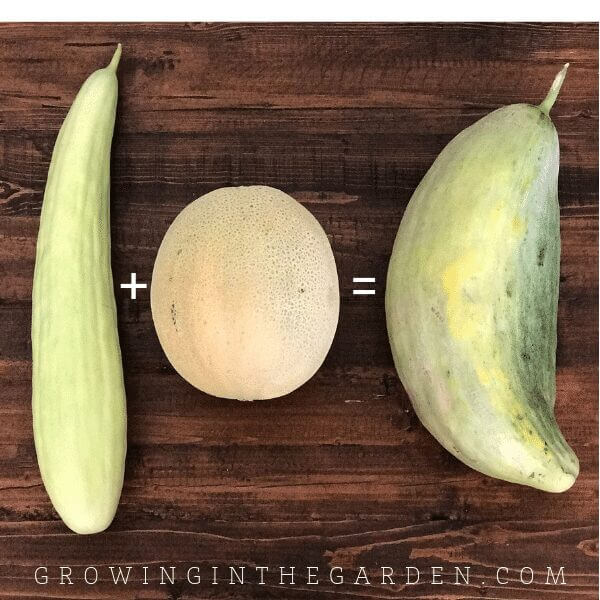
Real-Life Example: What Happens When You Save Cross-Pollinated Seeds
When I first started saving seeds, I made the mistake of saving seeds from an Armenian cucumber I had grown near cantaloupe. The next year, I planted those seeds and ended up with large, strange-looking fruits that weren’t good for eating. They were bland, tough, and clearly not true to the original cucumber.
That was my first lesson in cross-pollination. Even though Armenian cucumbers and cantaloupes look and taste very different, they’re both members of the Cucurbitaceae family and can cross-pollinate if grown close together.
If you’re saving seeds from open-pollinated crops like cucumbers, squash, or melons, it’s important to grow only one variety at a time or use isolation methods (distance, barriers, or hand pollination) to prevent cross-pollination. Otherwise, the seeds may not produce plants like the ones you started with.
When Does Cross-Pollination Affect the Fruit?
It’s important to understand that cross-pollination doesn’t affect the fruit in the current growing season. If you grow two related plants close together (like Armenian cucumber and cantaloupe) the fruit that develops that year will still be true to the parent plant and taste as expected.
However, if you save seeds from that fruit and plant them the following season, the plants that grow will carry the mixed genetics from both parent varieties. That’s when you’ll see strange, sometimes inedible results.
In other words, cross-pollination affects the next generation of fruit—not the current harvest.
This is why isolation is only necessary if you plan to save seeds. If you’re not saving seeds, you can grow multiple varieties of the same plant family together without worrying about cross-pollination.
2. Save seeds from only the best plants and fruit
Seed saving is a form of selection. The seeds you save today shape the garden you’ll grow tomorrow.
Avoid saving seeds from diseased or weak plants. Instead, choose seeds from the healthiest, most vigorous plants and the best-tasting fruit. By doing so, you’re encouraging those desirable traits—flavor, productivity, disease resistance—to carry on in future generations.
Want to take more steps toward self-sufficient gardening? Explore these tips in this article.
3. Seeds for saving must be fully mature on the plant
The best time to harvest a vegetable for eating is often not the best time to save its seed.
Seeds need time to fully mature on the plant to become viable. That means allowing the fruit or seed pod to stay on the plant well past the eating stage. The plant’s natural life cycle ends with seed development, so give it the time it needs to finish that process.
Be patient, fully mature seeds are more likely to sprout and grow into strong, healthy plants.
Examples:
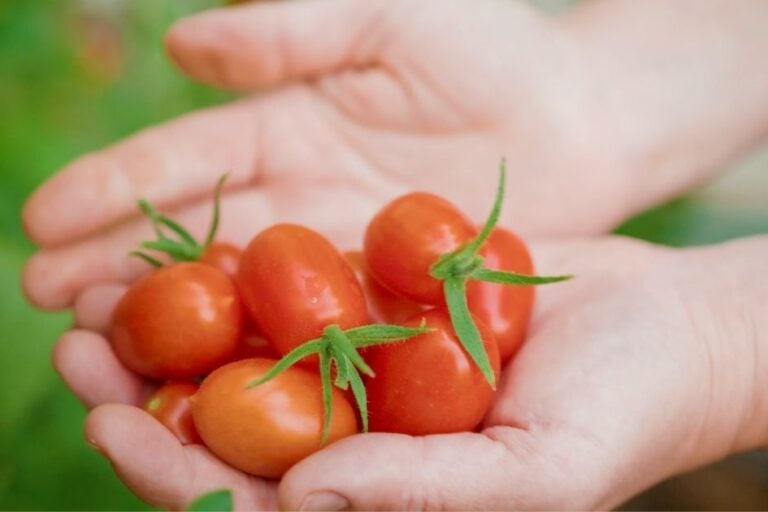
- For tomatoes, let the fruit ripen fully on the vine before harvesting seeds from the best ones.
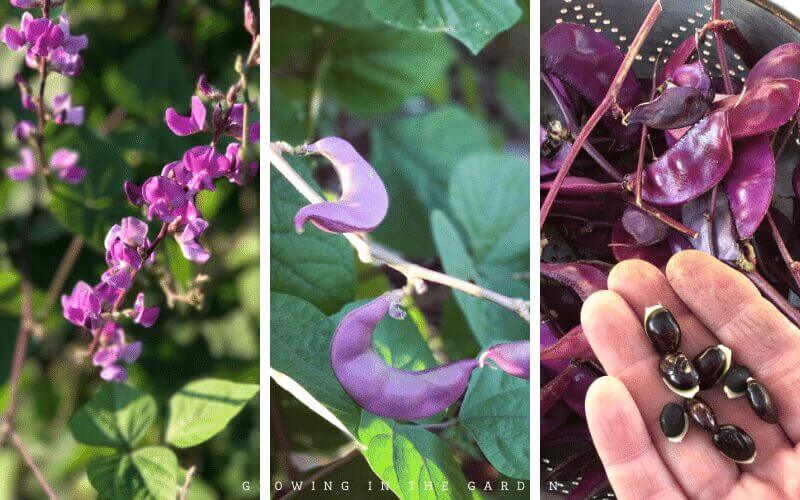
- Let beans and peas dry fully on the vine before harvesting for seed.
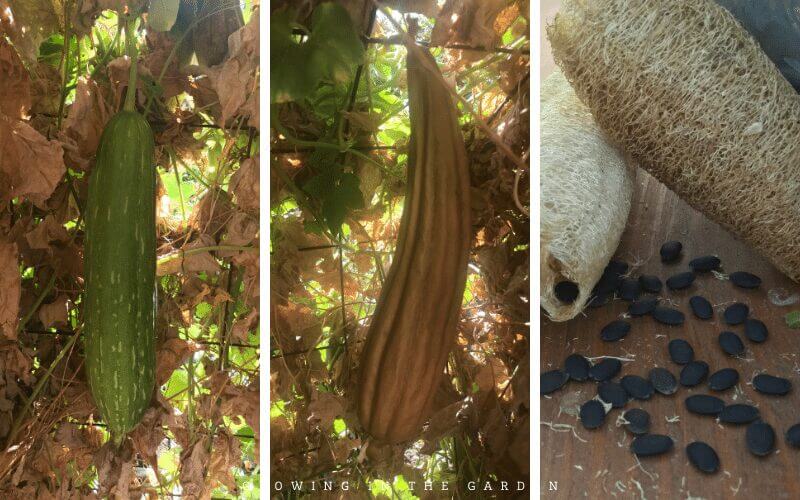
- Allow cucumbers and squash to stay on the plant until they turn overripe and their skins harden.
- Wait for lettuce, arugula, and other leafy greens to bolt and produce seed stalks that dry out before collecting.
4. Understand the difference between wet and dry seeds
The way you save seeds depends on how the plant produces them. Wet seeds and dry seeds require different methods for cleaning and storage.
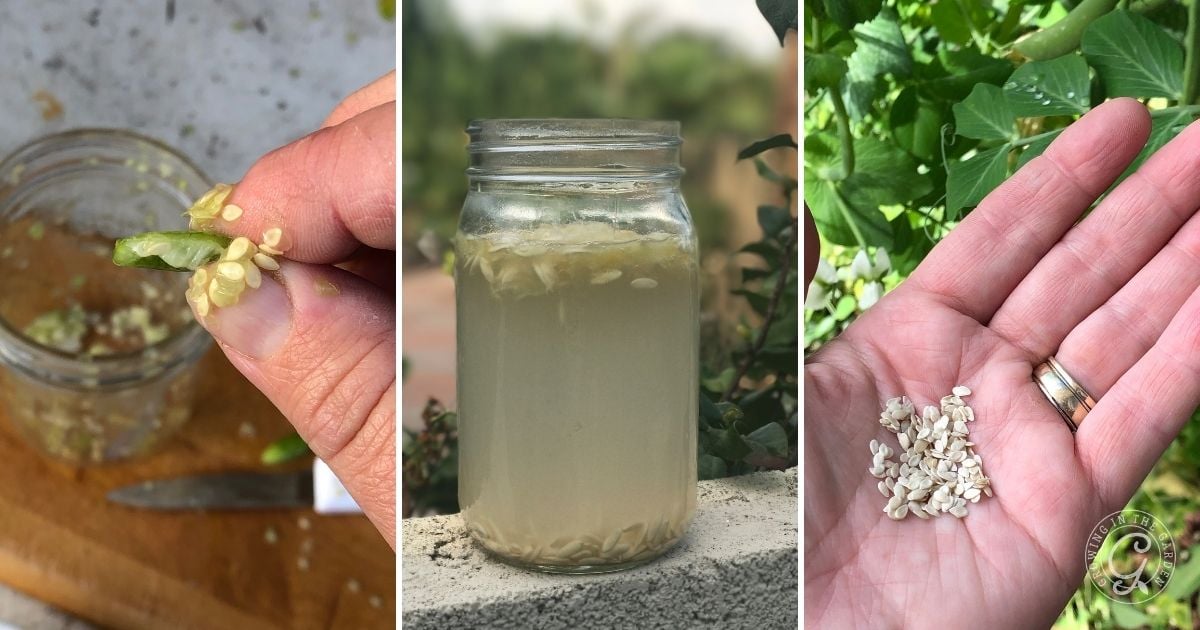
Wet Seeds Need Fermentation Before Drying
Seeds from wet, fleshy fruits like tomatoes, cucumbers, and cucuamelons are surrounded by a gel coating that inhibits germination. Fermentation removes this coating and helps prevent disease in stored seeds.
How to ferment wet seeds:
- Gather supplies: knife, spoon, glass jar, water, sieve, coffee filter, and a small bucket if needed.
- Scoop the seeds: Cut the fruit in half and scrape the seeds into a jar. Add a little water.
- Ferment: Let the mixture sit at room temperature for 2–4 days. Stir once or twice a day to prevent mold from forming.
- Separate viable seeds: Add fresh water, stir, and let the contents settle. Viable seeds sink; pulp and bad seeds float. Pour off the pulp and repeat until the water is mostly clear.
- Rinse and dry: Pour seeds into a sieve and rinse until they no longer feel slippery. Spread them out on a coffee filter or screen and let them dry completely. This usually takes 1–2 days.
Wet seeds that do not need fermentation include melon, eggplant, and ground cherry.
Simply remove the seeds from the fruit, rinse them well under running water to remove any pulp, and spread them out to dry completely.
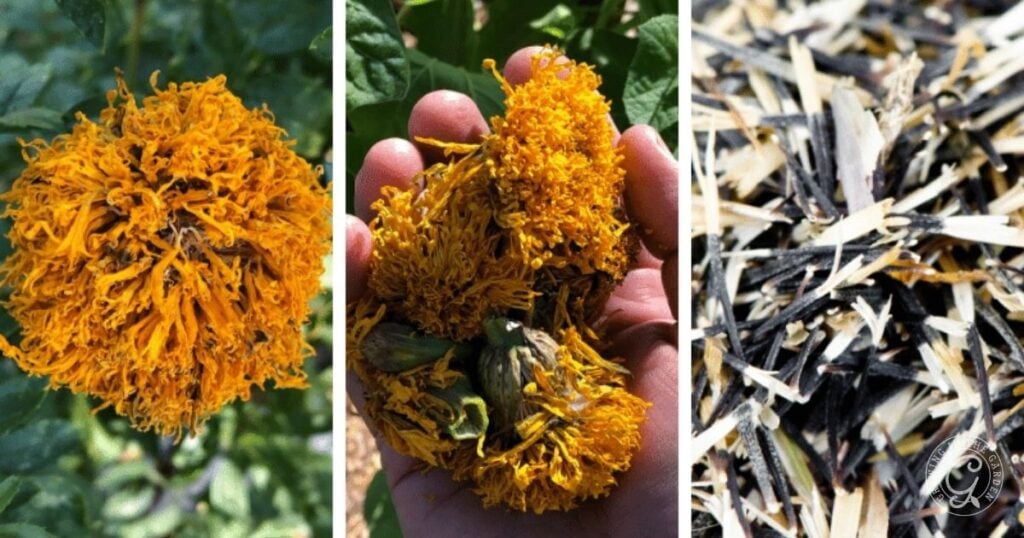
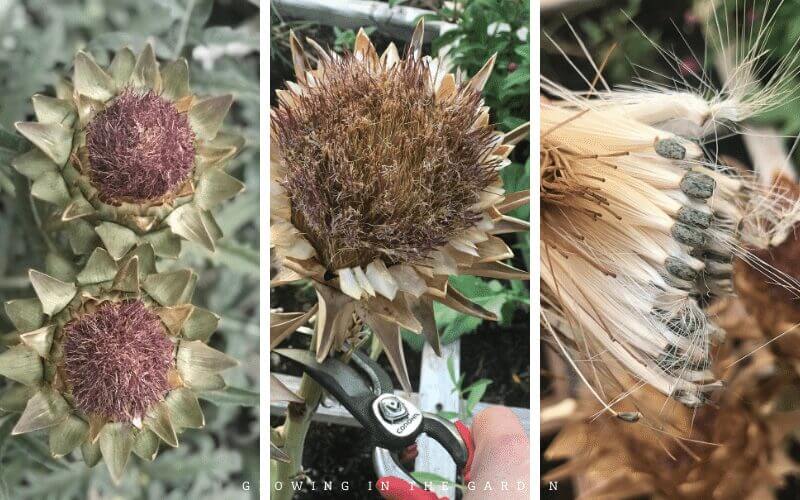
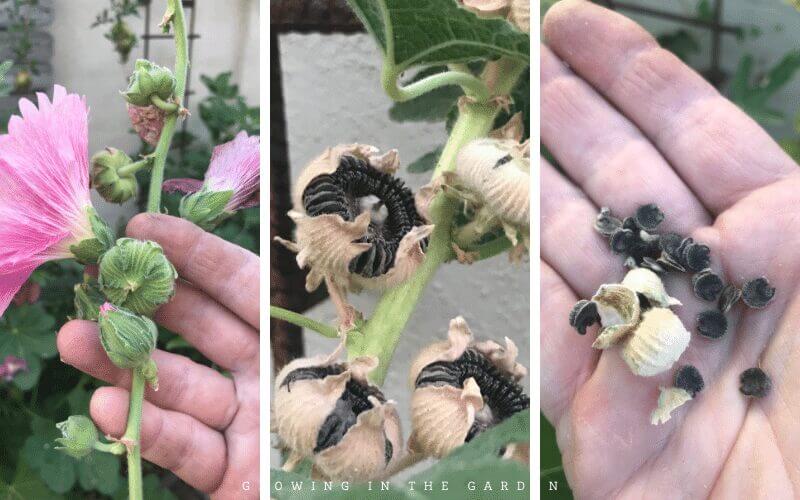
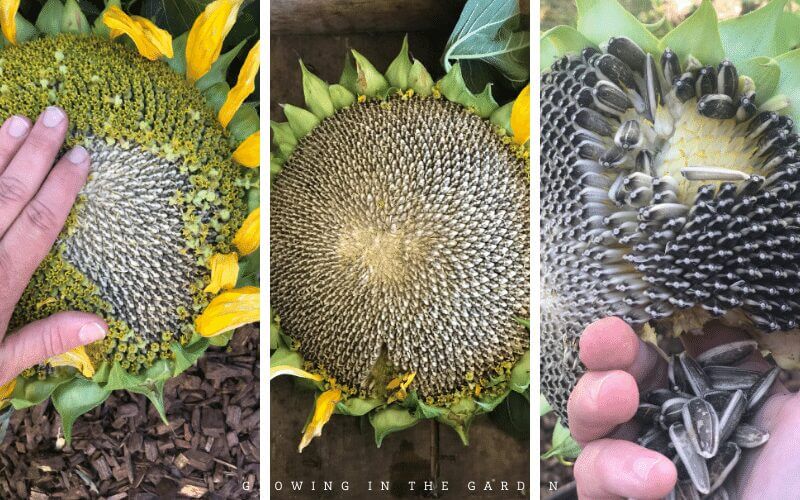
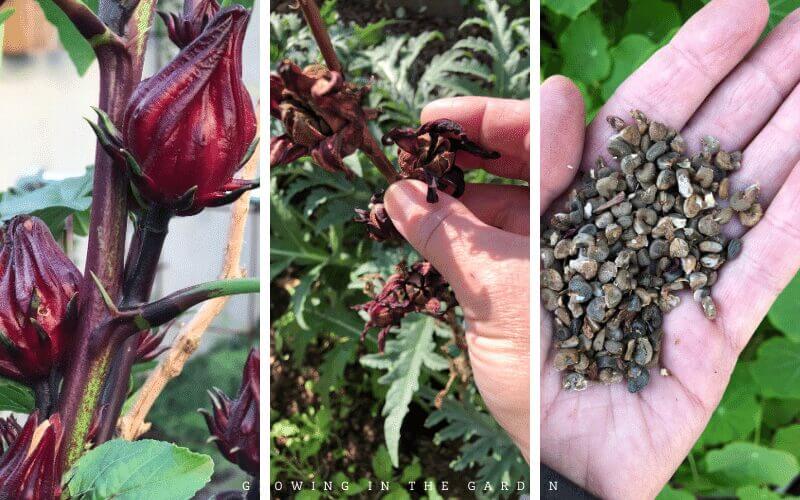
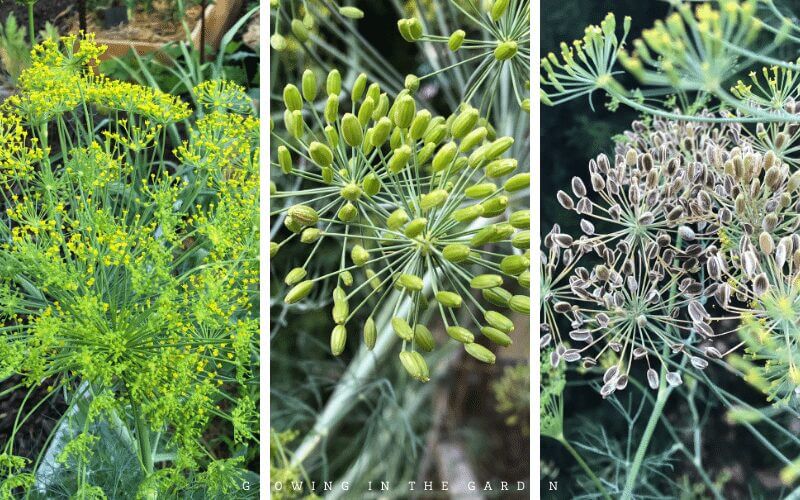
Dry Seeds Can Be Collected Once the Pods Mature
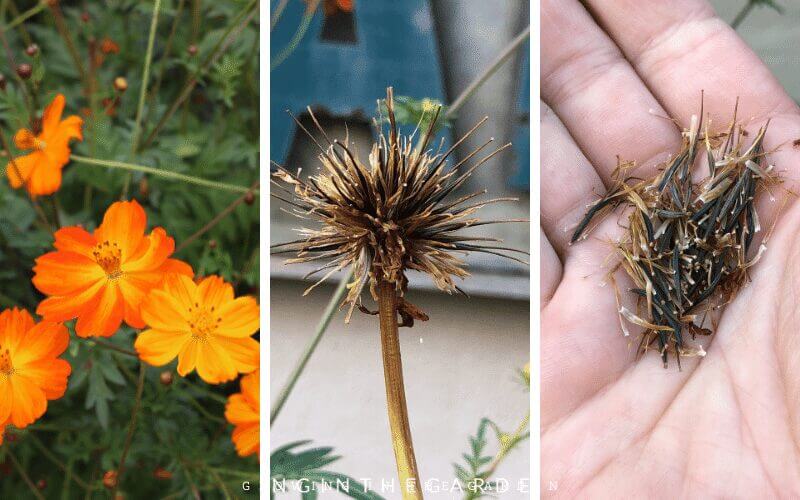
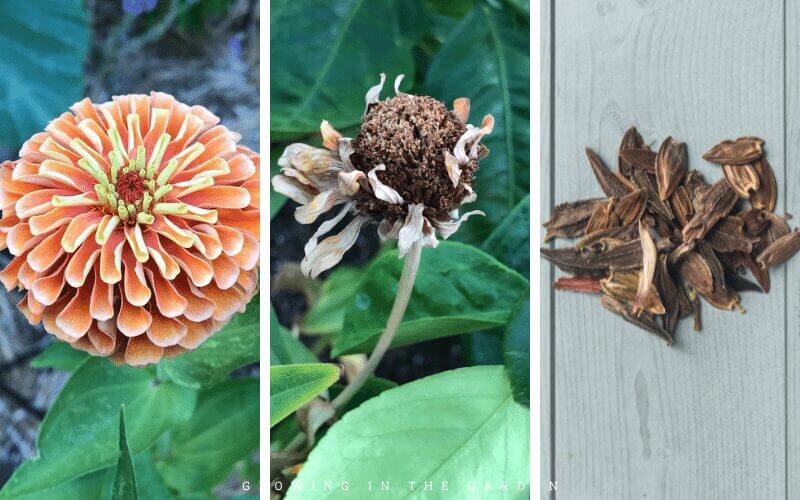
Dry seeds come from plants that naturally produce seeds in pods or flower heads. These include crops like sunflowers, hollyhocks, lettuce, arugula, and herbs.
How to save dry seeds:
- Allow seed heads or pods to dry completely on the plant.
- Harvest into a brown paper sack when the seed pods are dry and brittle.
- Remove seeds: Shake or crumble the pods to release the seeds.
- Let seeds continue to cure in the sack for another week or two to ensure they’re fully dry before storing.
Tip: If a crop bolts unexpectedly (like carrots or lettuce), you may still be able to save seeds.
Read Why Carrots Bolt in Their First Year to understand what triggers bolting and how to handle it.
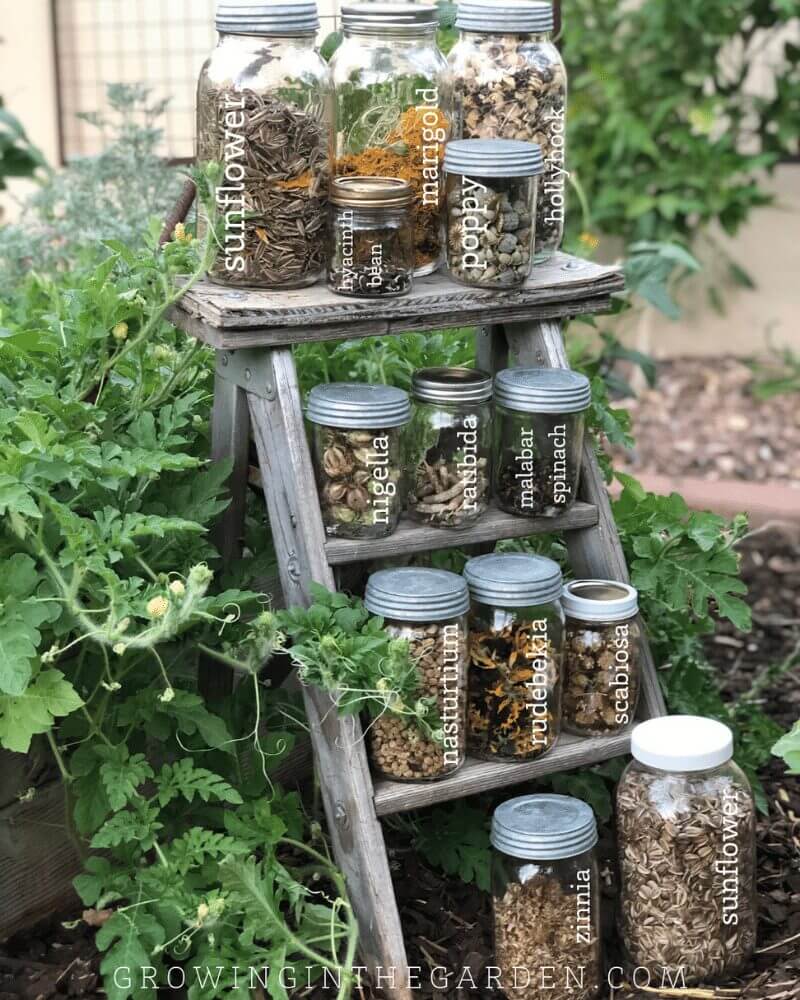
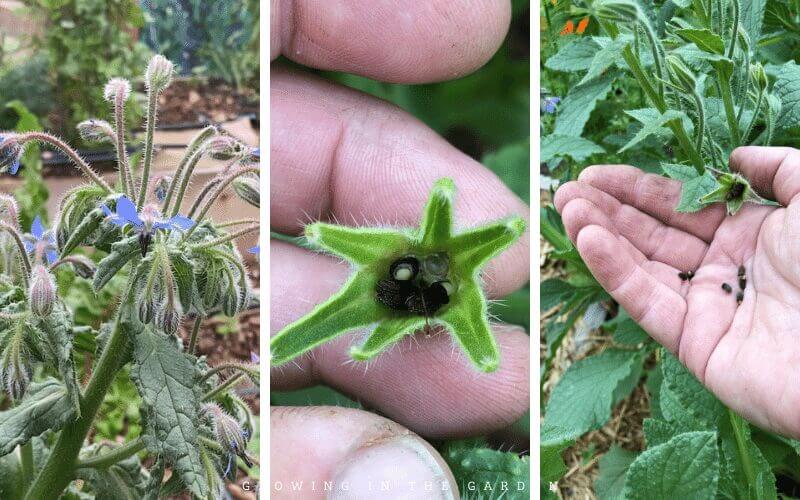
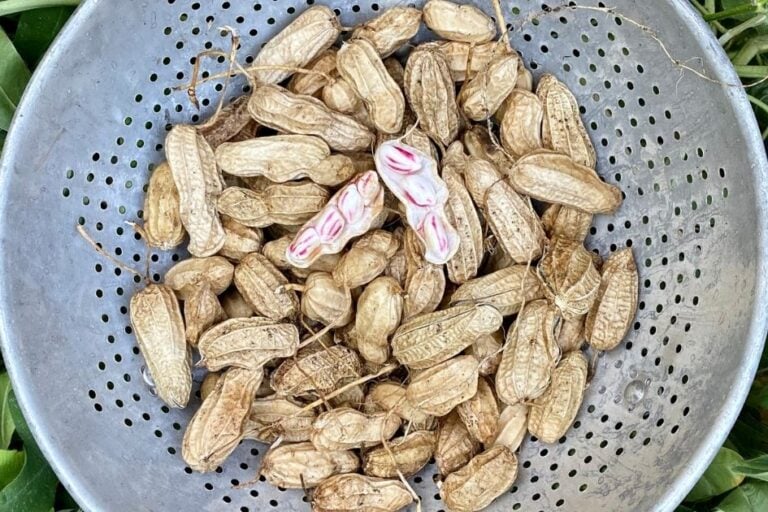
What Do Saved Seeds Look Like?
Every crop produces seeds a little differently. Some are large and easy to handle, while others are tiny and delicate. Seeing examples of mature, saved seeds can help you know what to look for when it’s time to harvest your own.
Below are images of saved seeds from a variety of vegetables, herbs, and flowers. Use these as a visual reference as you begin collecting and saving seeds from your garden.


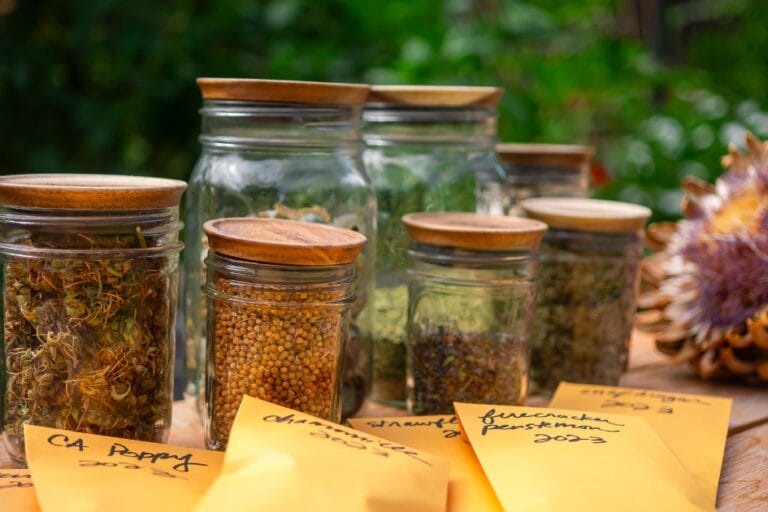
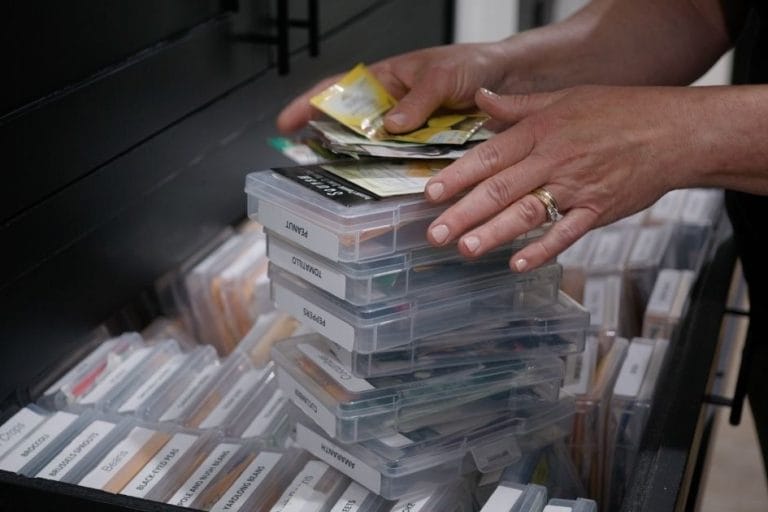
5. Once seeds are thoroughly dry, store them correctly
Proper drying is essential for successful seed saving. Seeds that are not completely dry are more likely to mold or rot in storage.
After drying, place seeds in labeled paper envelopes or seed packets. For longer-term storage, you can place those envelopes in airtight containers like mason jars. Always include the seed type and the harvest date on the label.
Store seeds in a dark, cool, and dry location. A closet, cupboard, or even the refrigerator can work well. Good storage conditions help maintain seed viability and extend their shelf life for future planting.

Want to dive deeper into seed storage?
Learn how to store seeds properly, prevent moisture damage, and find out how long different types of seeds will last.
Read more: How to Store Seeds and How Long They Last
6. Share your saved seeds with others
Set aside some seeds to plant next year, and then share the extras in a seed swap or donate them to a local seed library. Garden seeds also make great gifts for gardeners.
Did you learn something from this article? Please share it with others and begin observing the plants around you. Also, watch the life cycle of your plants. For instance, how do they make seeds? Can you save them?

Which seeds do you have success in saving? I’d love to hear from you in the comments.
Frequently Asked Questions About Saving Seeds
What are the easiest seeds for beginners to save at home?
Self-pollinating crops like beans, peas, lettuce, and tomatoes are great choices for beginners. These plants are less likely to cross-pollinate with nearby varieties and are easy to harvest and clean.
How do you know when seeds are mature enough to harvest?
Seeds are mature when they have fully developed and dried on the plant.
Can you save seeds from hybrid plants or grocery store vegetables?
Seeds from hybrid plants (F1 hybrids) usually won’t grow true to the parent plant. Grocery store vegetables are often hybrids or have unknown growing conditions, so the results can be unpredictable. It’s best to save seeds from open-pollinated or heirloom varieties grown in your own garden.
How do you ferment tomato or cucumber seeds for saving?
Scoop the seeds into a jar with a little water and let them sit at room temperature for 2–4 days. Stir daily to prevent mold. Once the viable seeds sink and the pulp floats, pour off the pulp, rinse the seeds, and dry them completely.
How long should you dry seeds before storing them?
Seeds should be dried for at least a few days, depending on the type and humidity levels. Most are ready when they break cleanly or feel hard and dry to the touch. Use a screen or coffee filter to dry them evenly.
What’s the best way to store saved seeds to make them last longer?
Store fully dried seeds in labeled paper envelopes inside airtight containers like mason jars. Keep them in a cool, dark, and dry location.
When does cross-pollination affect the fruit?
Cross-pollination doesn’t change the fruit you harvest this season, it only affects the seeds. The fruit you eat will be true to the parent plant. But if you save seeds from a cross-pollinated plant, the fruit grown from those seeds the next year may be bland, misshapen, or otherwise unlike the original.


Very informative , enjoyed reading .
Thanks so much, glad it was helpful.
Thank you for this article. Very interesting. I am almost to this phase of gardening right now.
You’re welcome. Saving seeds is such a rewarding part of gardening.
You mentioned fermenting the wet seeds. How exactly do you do that?
Put the seeds in a jar and cover with an inch or two of water. Let them sit in the water (it will begin to smell and ferment). During fermentation, bad seeds generally float to the surface of the water while good, viable seeds sink to the bottom. Ferment the seeds long enough to release the clean seeds from the pulp without waiting so long that the seeds start to sprout. (Usually 1-3 days) Pour off the top layer of water with the pulp and bad seeds. The viable seeds will be at the bottom of the jar. Dry the viable seeds on a paper plate or wax paper.
“seeds for saving “ do i understand that when the plant done producing leave a few fruit to mature fully then harvest for seed?
great article. thank you.
Deb
Yes, that’s it in a nutshell.
Thank you so much for your amazing knowledge on plants. Very inspirational A great read and one to refer to again for future reference. Thanks Angela
So kind of you to say, thank you!
First, I want to tell you how much I have enjoyed your videos and your posts. I look for a new post almost every day! I could do a better job at saving seeds and that has become my goal. I struggle with geraniums. How and when is the best time to “harvest” geranium seeds?
Thank you! Leave the flowers on the plant at the end of the season and allow the seed pods to develop, and then harvest the seed heads in a paper sack before they burst and allow to dry.
How long can you save harvested seeds? I have several I have saved from last year and more that I ordered online but have just found out I will be unable to have a garden this year. I’m hoping they will still be good for next year.
Here is a blogpost that may be helpful: https://growinginthegarden.com/seed-storage-organization-tips/
Very well written! Thanks a bumch!
Thank you!
I have a question. If the sunflower seeds dried on the flower head, and you let it stay until it died, can you still harvest the seeds for planting in the future?
Yes
I might have overlooked it but I was wondering how to save Jalapeno seeds or any kind of pepper seeds as far as that goes
Good point. I should add them. Here’s some information: Generally, peppers are self-pollinating, but insects can cause cross-pollination. Keep varieties 100 feet (30m) away from each other. Seeds are ready when the fruit is fully ripe. You can increase seed quality by removing all but a couple of fruits from the plant and saving those seeds. Also, it’s best to save seeds from the first fruits rather than later ones. Spread seeds out on a flat service and allow them to dry until they crack when broken in half.
Great article and pictures! Thank you for sharing.
I got a great heirloom tomato at the local farmers market, organic grower! Saved the last slice with seeds,and got enough seeds for my whole family to have 3 plants each! Just enough for eating! Mom used to get 12 or more plants to sell and can, from the green house.
It’s more work to start the seeds in ( Feb. For NY state) but the savings, cost one tomato $.50. I was getting the tomato to eat any way, so I say it was free seeds!!!
Great tip!
This is great information, the only thing that I’m not sure about is storing my watermelon seeds. Do I store them in the freezer or just in a dark place until the next planting season?
A cool, dark place is best. Here is a blogpost with more information: https://growinginthegarden.com/seed-storage-organization-tips/
Need to learn how to save the seeds of Torch Tithonja. Just getting started with this plant.
Great information, thank you for taking the time to share, I really enjoyed the article / knowledge.
I haven’t planted for a while, but I used to get a TON of seeds from my morning glory plants.